
The Communal Whiteboard is an interactive display tool for discussion or illustrated lectures within Second Life. The main ideas behind its design - are to have a slideshow presenter, that anyone can add or remove pictures from, plus a range of overlay tools that can be used to annotate or point to areas of interest within an image. These overlay tools can also be used to create simple mindmaps or visual polling events.
How to Use...
The controls for the whiteboard - use touch, voice control, and users' arrow keys.
It is best that you stand at a distance away from the board - so you can see it in full ( or use the scroll button on your mouse to set your vision further back. )
Adding Images to the Board
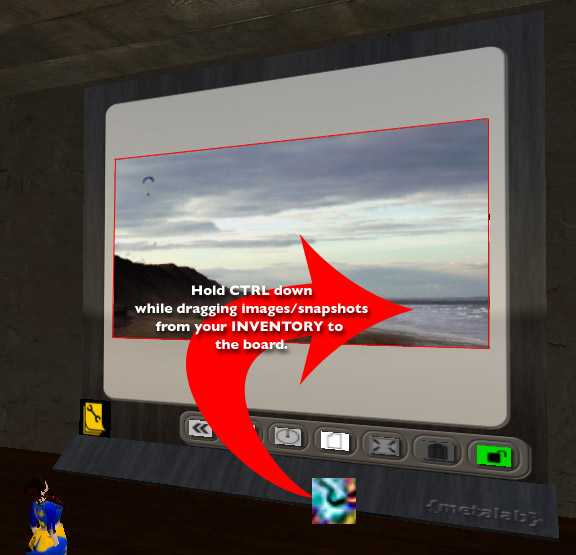
As the board is communal anyone can place images on the board ( unless the owner's lock is enabled )
NB: The slide order within the board is based on alphabetical / numeric filenames. Therefore it is good practice to consider a naming protocol before dragging the images to the board . ie. 01 - Introduction
The Slideshow Controls

1. Back- Step back thru the image contents of the whiteboard, it will stop when you reach the first slide.
The Owner can also say 'back'
2. Next - Step forward thru the image contents, until the last slide is reached.
The Owner can also say 'next'
3. SlideShow Timer - Touching this button opens a listen dialog with the person who touched it. Saying a number will determine the number of seconds delay between the images shown, ie. say '5' if you want the slides to have a 5 second delay between them.
You have 10 secs to answer this request, or it will stop listening, also saying something other than a number will also give an invalid response.
Once the timer is set - the button will turn green - to indicate it is in Timer Mode.
Whilst in this mode - the slideshow will loop thru the image contents.
To Stop the slideshow - touch the timer button again.
4. Templates - This button replaces the current slide - with a library of background images for use in brainstorming, voting, or even tic-tac-toe. Clicking on the button will open up a dialog window with the images you can choose.
To get rid of this background image, click either the next or back buttons.
5. Aspect Ratio - The main viewing screen can alter its size to best accommodate the images used or brought into Second Life. There are three settings :
4:3 - images that were originally 800x600 pixels / or videograbs brought into Second Life.
1:1 - square based images - ie. 512 x 512 pixels ( useful for displaying many of the textures in Second Life )
2:1 - Panoramic mode - images set to 1024 x 512 pixels
6. TrashCan - clicking this button will delete the image presently shown on the mainscreen. A dialog window will open to give you a Yes/No option, just incase you touched it by accident.
7. Owner Lock - When this is enabled - only the owner of the whiteboard can use it.
When the button is Green - it indicates anyone can use it.
When the button is Red - only the owner can interact with the slideshow controls or drag images to the board.
Touching the flap at the bottom of the whiteboard, will hide or show the button row.
Overlay Tools
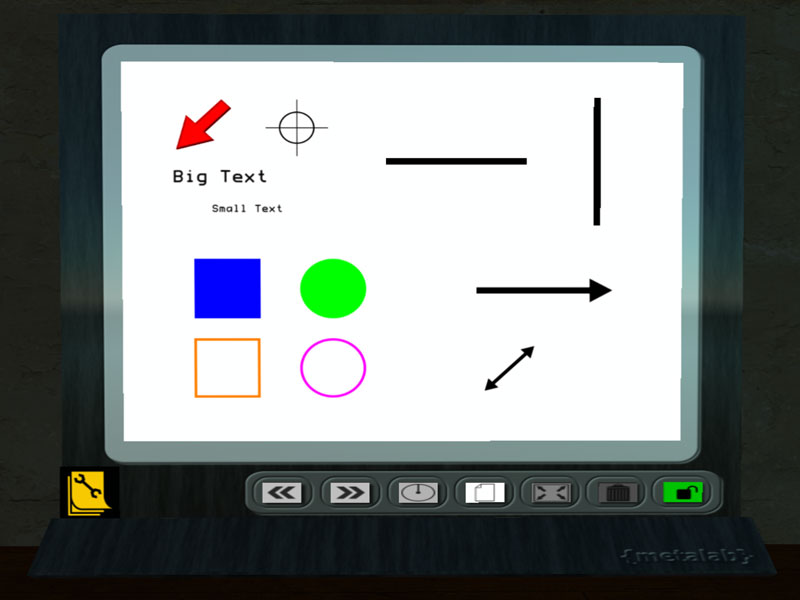

At a simple level - a pointer maybe enough for most uses, as a tool to point to specific parts of an image on the board.
Clicking the Yellow Spanner Button will open a dialog window of which tools you can place on the board.
At present they consist of:
Pointer and Crosshair
Big and Small Text
Filled Rectangle and Circle
Outline Rectangle and Circle
Vertical and Horizontal line
8 directional Arrow - with one / two headed option
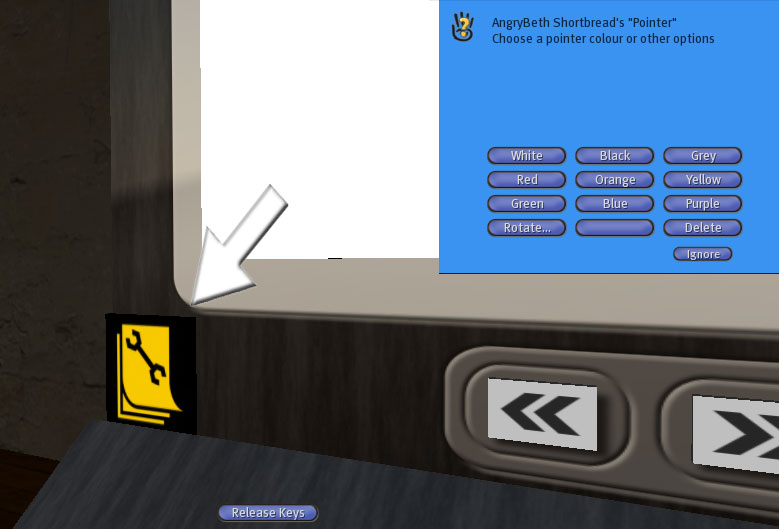
Once a tool is chosen, it will appear in the bottom left of the board.
Click on the tool, and a dialog window will open asking you if you want the tool to take your controls. Saying yes will allow you to move the tool around using your movement keys / arrow keys.
It will also open an options window - that allows you to change the colour / transparency of the tool, and depending on its type - scale and orientation too.
To leave the tool at a certain place - click the blue release keys button at the bottom of the window.
Clicking the tool again - will allow you to move it again, or change its options.
To delete the tool off the whiteboard, in the options window there is a delete button.
The Text tools, when clicked on - will open a timed listen event with the avatar that clicked it, this allows a line of text upto 24 characters to be presented on the board. Please allow sometime for the text to rez properly.
Example of a Visual Voting Event using tools on the board.
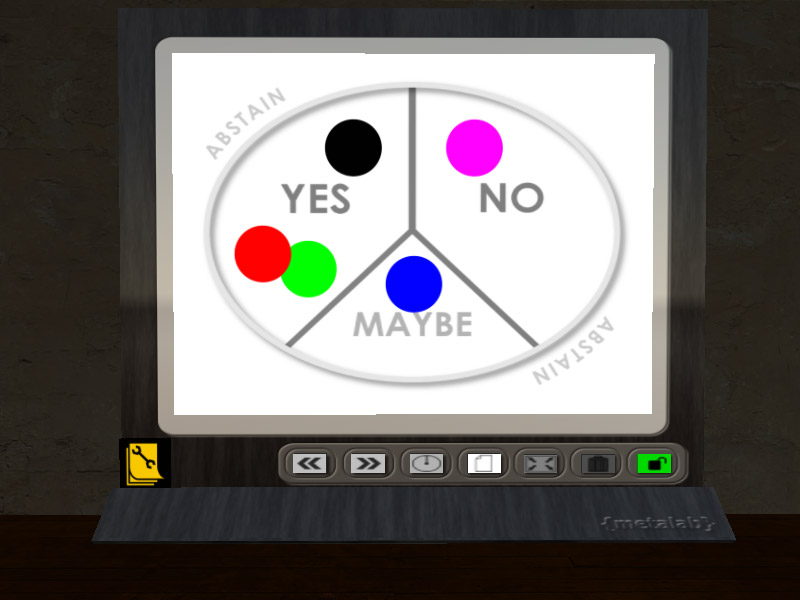
Here is an example of what could be achived by a small group of users.
The background is the VoteWheel from the templates button.
The coloured circles represent each member of the group.
These visual counters, can be moved around the screen, by the individual to indicate how they want to vote.
This could be a useful for True / False quizzes, or when a group is debating something.
NOTES:
To keep a copy of the tool elements as they are layed out on the screen,
the workaround at the moment - is for the owner of the board, to enter Build mode,
and Shift click to select all the tools on the board - then choose Take Object or Take Copy.
This will allow you at a later date - to drag the objects from your inventory back onto the board for further manipulation ( You don't need to hold CTRL for that process )
Be in Build/Edit Mode while you do this, so you can align the tools with the board.
This is a version 1.0 board at present;
future revisions will include more template backgrounds ( any suggestions are useful )
additional tool types - thought cloud and triangle shape
A Goto Slide button - to jump to a specific slide number

23 comments:
Thanks Angrybeth, cool board.
Hello Whiteboard inventor,
I'm wondering if the whiteboard could "freeze" into a 2D version, so that everyone could be sure to focus from the best camera angle.
I was at a crowded Sloodle session with many people sitting, standing or even flying in the foreground, and found it very hard to have a look so that I could really read text.
I've only been inworld for two weeks and might need more exercise to navigate and manipulate objects, but same goes for our potential student participants.
yours, SusNy (inworld)
It would be really handy if the text were a bit bigger.
I've been having a go at creating a text ordering activity, by typing in short pieces of text for students to manipulate. It took quite a time using big text and once I finished there was no way to save it! Any way of saving activities????
best
Nik
How can I get a copy?
Beautiful work! I am looking to set up a learning centre inworld. This tool would prove invaluable to learners. Please let me know how I can purchase/test a copy. And, is the installation way enough for non-specialists?
Regards,
Rose Amat (SL)
Of course, I was trying to ask if the installation is easy enough for those of us who are new to the Metaverse.
...That's the last time I try to type in the dark with a spoiled Chihuahua draped over one arm! :)
Regards,
rose
What an interesting whitebaord for second life. Where can you get your hands on it?
you can get it at: http://slurl.com/secondlife/Gourdneck/195/233/67/
cheers
Fire Centaur
you can get it at: http://slurl.com/secondlife/Gourdneck/195/233/67/
cheers
Fire Centaur
you can get it at: http://slurl.com/secondlife/Gourdneck/195/233/67/
cheers
Fire Centaur
Thanks for the tools and this may sound daft but where can I find instructions on how to take the Whiteboard out of its box and set it up for the first time?
Neon
Great! I had the board for ages in my inventory, and never found the time to see how it works.
That's what each educator has always dreamt about...
Thank you angrybeth! You are great!
anna begonia
thanks AngryBeth! ghossamermoon
The board looks great, but I wish someone would explain how on earth to get it out of its box and open it. Why are "simple" questions like this so often overlooked? It is highly frustrating not to know and wastes an awful lot of time finding out. This question has been asked once before, but not answered. That's not good.
Release Keys button not showing on my screen. Please advise...
for online education please visit
www.gurukulamuniversity.in
Excellent - I am using it for my Learner Resource Center at Teaching 10 / Capella Univeristy in the IT2240 Intro to Programming course. A nice addition would be some way to build flowcharts live. Thanks either way - great tool.
Hi this looks wonderful .. I am standing in SL now looking for the box ... I'd be really grateful for a clue about location! Karelia Kondor
Hey guys, I don't know if i'm missing something, but i can't find this board at the slurl above.
Could someone add me in game and help me out ?
sulaymaanhasan.inaka
Thanks in advance.
Try here: http://maps.secondlife.com/secondlife/The%20Port/128/128/26
hello, great whiteboard, but how can someone export it to use it in opensim? We have bought it but we can't export it...
http://VisitsToMoney.com/index.php?refId=246811sci
Post a Comment